
When it comes to getting a perfect you must have a level bed. For my TEVO Tornado I use a BL Touch to automatically measure my beds level before every print. Notice I said measure my beds level instead of level my bed. This is because the BL Touch doesn’t actually level your bed, it just measures how unlevel it is in different points allowing your printer to automatically adjust itself while printing. This process works, however you’ll still get a much better print if you ensure your bed is actually level before printing. Enter the Bed Level Visualizer…
What is it?
The Bed Level Visualizer is a plugin available for your OctoPi (I’ll add a tutorial for setting up an OctoPi in another post). This plugin allows you to see a colored 3D graph that indicates how level your bed is and where adjustments are needed.
What do I need?
In order to use the Bed Level Visualizer you will need an OctoPi as well as a BL Touch, or some other compatible auto bed leveling sensor. Next you’ll need to have the Bed Level Visualizer installed. You can read my post on installing OctoPrint plugins to learn how to install this and other plugins.
Setting it up
Before you can use the Bed Level Visualizer you’ll need to add some GCODE commands so it knows how to get the information it needs from your printer.
Open the OctoPrint settings window by clicking on the settings icon at the upper right corner of the screen and clicking on the Bed Visualizer option under the plugins section on the left.
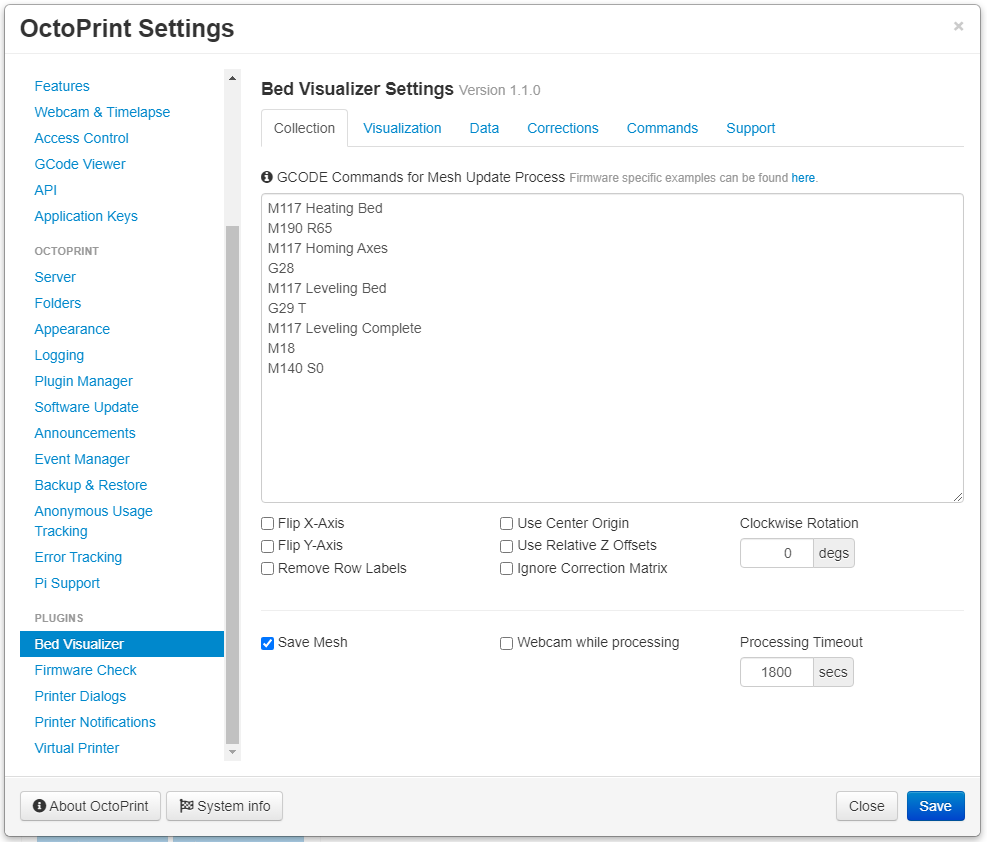
GCODE
GCODE is the language used by many 3D printers. It provides step by step instructions for everything from how the printer should move to what it should display on the screen.
I’ve entered some GCODE here that I use for my printer for the Bed Level Visualizer. Let’s walk through what it’s doing.
M117 is a command to display a message on the printer’s screen. So for the first line I’m displaying the message “Heating Bed” on the printer’s LCD screen. This is completely optional and not at all necessary for the Bed Level Visualizer to work.
M190 sets the temperature of the printer’s bed and waits for the printer bed to reach that temperature before continuing. This is only used if your printer has a heated bed, but if it does it’s important that you include this. Heating the bed changes the shape of the bed slightly, so it’s important to only check the level of your bed when your bed is heated. The R65 tells the printer to set the temperature to 65°C. You should change this number to be whatever temperature you normally set your printer bed to when printing.
G28 tells the printer to home all of its axes. This is important because the printer needs to know the exact position of all three axes before it can measure the bed’s level.
G29 tells the printer to probe your printer’s bed using the auto bed leveling sensor attached to your printer, in my case a BL Touch. The T flag specifies that you want it to return the results of the probing. This is important because the Bed Level Visualizer reads these results so it can draw the graph for you.
M18 disables all of the stepper motors on your printer. This basically stops sending power to the stepper motors for all the axes on your printer and allows you to, if necessary, move the print head or bed by hand. This isn’t necessary for bed leveling but I like to include it at the end because I figure that I’m done using the motors, done leveling the bed, so why not turn them off.
M140 is similar to M190 in that it sets the temperature of the print bed. The difference, however, is that the M140 command doesn’t wait until the bed has reached that temperature before continuing. The S0 command tells the printer to set the temperature to 0°C. Basically turn off the bed heater because we’re done. This is only necessary if you have a heated bed and you used the M190 command earlier to heat your bed up.
So the GCODE I’m using is as follows:
M117 Heating Bed
M190 R65
M117 Homing Axes
G28
M117 Leveling Bed
G29 T
M117 Leveling Complete
M18
M140 S0
Fell free to copy this code and tweak it as you see fit.
Once you’re done click on the Save button at the bottom right corner of the window and your settings are saved.
Running the plugin
To use the Bed Level Visualizer click the hamburger menu icon in the upper right corner of your OctoPrint display and click on the Bed Visualizer option.
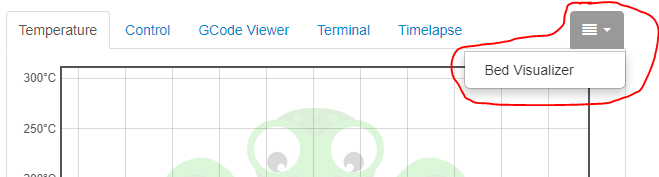
This will bring you to the Bed Visualizer tab, which at this point is likely blank. Now click on the Update Mesh Now button at the bottom.
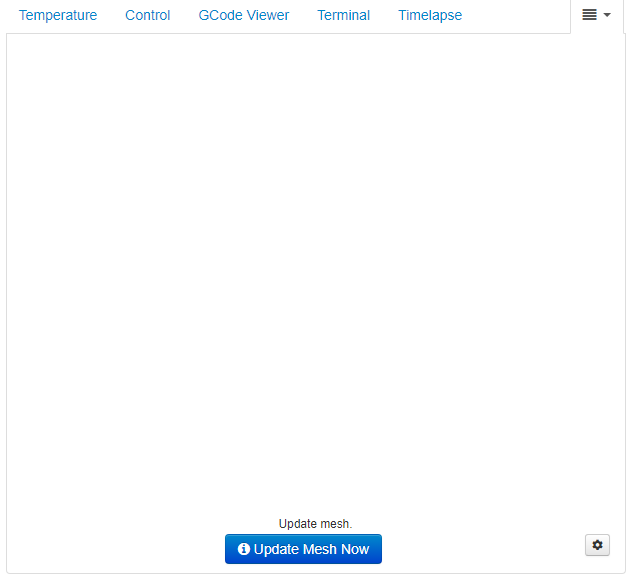
Now’s the hard part… Waiting. At this point the printer is going to run the GCODE you entered earlier and we have to wait for that to complete before can see any results.
The results are in!
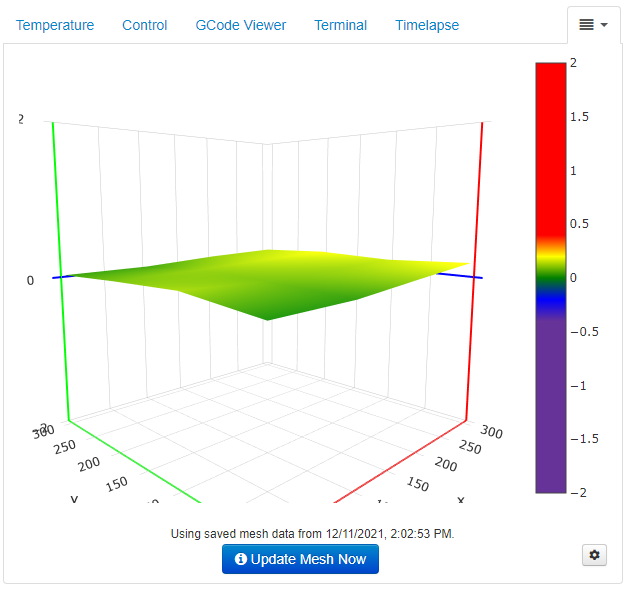
Now you should see something similar to this image. This graphic shows how level your bed is. In general green is good and what you want to see the most of. Don’t panic if it looks like your bed is way off. If you look at the numbers on the colored bar to the right on my example you’ll see that the range is only plus or minus 2mm. That’s not a lot, though the graph may make it look like it’s worse than it is. In general you can move your mouse to each of the corners of the bed in the graphic and find how close that corner is to zero, which is your goal. This will tell you which corners of your print bed need to be adjusted, either up or down, to get it closer to zero. Don’t rip your hair out trying to get exactly perfect, pretty close is good enough. For my sample above my corners ranged from 0.019 to 0.198. Being this close on each corner, combined with the fact that I use my BL Touch to level my bed before every print, gives me results I’m happy with.

That is really fascinating, You are an excessively professional blogger.
I’ve joined your rss feed and sit up for in the hunt for more of your wonderful post.
Additionally, I’ve shared your web site in my social networks
Heya i am for the first time here. I came across this board and I in finding It really helpful &
it helped me out much. I’m hoping to present something again and aid others
such as you helped me.
I think the admin of this site is truly working hard in support of his web
page, for the reason that here every material is quality based data.
Greate post. Keep writing such kind of info on your site.
Im really impressed by your blog.
Hey there, You have performed a great job.
I’ll definitely digg it and in my view recommend to my friends.
I am confident they will be benefited from this website.